Welcome!

By registering with us, you'll be able to discuss, share and private message with other members of our community.

SignUp Now!

Woodworking pt. 2

Sandford’s_Finest

Poster
Founder
Joined
Jan 11, 2021
Messages
210
After the unfortunate and accidental thread merge, I was gonna repost after finishing my current project but thought it better to start it and re-tag everyone who posted their stuff while I could still find the original posts.

So, @irishaaron @poke2001 @GarnetPild @ArmchairTiger @crosby6818 please feel free to repost your work. All were really great work. I’ll repost my coffee table if anyone missed it and would like to see it.

Also if you have any tips/tricks, shortcuts, knowledge to share please do so! I love doing woodworking projects and am always looking for ways to improve my work.
 

ChicagoFats

Legendary
Founder
Member
Joined
Dec 1, 2020
Messages
4,663
After the unfortunate and accidental thread merge, I was gonna repost after finishing my current project but thought it better to start it and re-tag everyone who posted their stuff while I could still find the original posts.

So, @irishaaron @poke2001 @GarnetPild @ArmchairTiger @crosby6818 please feel free to repost your work. All were really great work. I’ll repost my coffee table if anyone missed it and would like to see it.

Also if you have any tips/tricks, shortcuts, knowledge to share please do so! I love doing woodworking projects and am always looking for ways to improve my work.
Unfortunately I dont have much to add, only done a couple of small projects but look forward to following the thread. Nice work on the table you posted last time
 

Sandford’s_Finest

Poster
Founder
Joined
Jan 11, 2021
Messages
210
Unfortunately I dont have much to add, only done a couple of small projects but look forward to following the thread. Nice work on the table you posted last time
Thanks - it ended up being easier than I expected once I had all the tools I needed. And please feel free to post any projects no matter how small. I like seeing other projects so I can get ideas on things to do and ways to improve my skills
 

shiv

John
Administrator
Founder
Member
Joined
Dec 1, 2020
Messages
13,743
One time I made a cardio box for box jumps out of pressboard. Jumped on it once and it went flat. So usually in threads like this I recommend not what to do - I wouldn’t do that.

I had this idea about going back to the crossroads of woodworking meets electronics though. Like the old furniture set TVs and radios. That stuff has really disappeared and might be nice to see a come back
 

Sandford’s_Finest

Poster
Founder
Joined
Jan 11, 2021
Messages
210
One time I made a cardio box for box jumps out of pressboard. Jumped on it once and it went flat. So usually in threads like this I recommend not what to do - I wouldn’t do that.

I had this idea about going back to the crossroads of woodworking meets electronics though. Like the old furniture set TVs and radios. That stuff has really disappeared and might be nice to see a come back
I love the vintage stuff, especially Art Deco pieces. I’m not nearly skilled enough yet to produce any of those pieces tho.
 

LVRebel

GIF specialist
Founder
Member
Joined
Dec 9, 2020
Messages
2,969
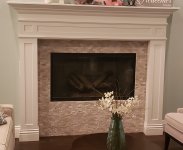
I'd love to do more wood working, so I'll be following this thread and appreciate insight into what tools you guys are using, and methods to build everything. I'll work on getting a few pics of the fireplace surround that I built, and of my raised planter beds as well.
 

GarnetPild

Legendary
Founder
Joined
Dec 2, 2020
Messages
3,914
I was meaning to ask - how long did it take to get the stocks milled and sanded to the final shape and curvature?

Well it took alot longer than it should have. I used some tools at my Dad's wood shop to do the cutting and drilling. I had the intention of using a sander while I was there to get them mostly done, minus a little hand finishing. We were running out of time, so I decided to leave them flat on both sides and just hand sand them down when I got home a couple days later.

Let me tell you, they call it desert ironwood for a reason. I bet I have at least 40 hours of smoking, sitting on my front porch with some music and a beer, and sanding away at those blocks of wood. Then finished them with tung oil and tung oil varnish. Not wild about that feel, thinking about taking off the varnish & just leaving oiled wood.
 

Sandford’s_Finest

Poster
Founder
Joined
Jan 11, 2021
Messages
210
Well it took alot longer than it should have. I used some tools at my Dad's wood shop to do the cutting and drilling. I had the intention of using a sander while I was there to get them mostly done, minus a little hand finishing. We were running out of time, so I decided to leave them flat on both sides and just hand sand them down when I got home a couple days later.

Let me tell you, they call it desert ironwood for a reason. I bet I have at least 40 hours of smoking, sitting on my front porch with some music and a beer, and sanding away at those blocks of wood. Then finished them with tung oil and tung oil varnish. Not wild about that feel, thinking about taking off the varnish & just leaving oiled wood.
There’s a channel I follow on YouTube - my mechanics - and any time he fabricated a wood handle he uses linseed oil, but I don’t know if it would be applicable for ironwood or other hardwoods. If so then that may be worth a go because I think it also acts as a pretty good protectant.

Either way the stocks look really nice.
 

LVRebel

GIF specialist
Founder
Member
Joined
Dec 9, 2020
Messages
2,969
That looks really good. The paint looks like the same color as the trim in my house. Did you run into any problems cutting the edges for the molding on the mantle? I’ve never been good at cutting edges for crown molding. Thank God for caulk.
Thank you. I don't remember having any major issues. As you said, it's a pain in the butt, so I cut a couple of practice pieces, but yeah, still needed a little bit of caulk to get the nice smooth edge.
 

LVRebel

GIF specialist
Founder
Member
Joined
Dec 9, 2020
Messages
2,969
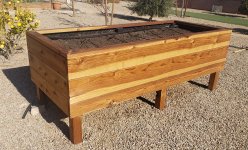
I’ve been considering doing one or more of these for my backyard with something like redwood or cedar. How long did it take you to build this one? I really like the redwood.
It's hard to say because I spread it out over a few weeks. I've also built on grade planters, and they're wayyyy easier. The only reason I did this one was because my wife really wanted one. Here's the process below, in spoiler format for those that don't want the wall of text.

With the above ground, I had to dig some holes for the posts, and use concrete to keep everything in place with the heavy winds that we get. But really, the biggest difference was dealing with the drainage. With an on ground planter, there's not much need for this. For the above ground planter, I looked at a bunch of different options on how to deal with drainage, but ended up doing the following:

I installed several cross beams (2x4) spanning the short direction (about every 12-16"). Then, I installed a piece of heavy plywood that had to be notched a little around the posts, and screwed that all together. Since it's basically flat, I wanted to ensure the water didn't sit stagnated on the bottom, so I used some compound to basically create a slope on top of the ply wood, going towards the location where I would install the drains.

After I got a good slope, I used some caulk, outdoor paint, and filler to get a pretty good seal on the inside of the planter. The reason for this was to reduce the amount of water that gets in through the seams on the perimeter, and then rot out the plywood. I then drilled holes for (2) 4" diameter drains (with cover) in the plywood.

Next, I installed a heavy plastic liner in a single piece on the entire inside of the planter to keep the soil and water from escaping through the sides and getting on the plywood base. Once this was in, I cut the holes in the liner, and installed the drains, then sealed off the region around the drains using caulk and some of that flex seal stuff.

Next, I put some coarse sand in the bottom to help the water flow to the drains, then a layer of small rocks over that, for a total of probably 1 1/2 - 2". Next, I installed a layer of weed guard over the rocks and sand, that will keep the soil from going into the rocks and messing up the drainage. Then added the soil.
 

EdgeBest

Poster
Joined
Jan 11, 2021
Messages
196
RE planters - use peat moss and perlite (white balls) for the majority of the soil. lightweight and drains easy. top layer should be the dirt of your choice

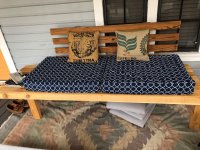
Front porch needed more seating, this is a 8ft cedar outdoor sofa with built in side table i did during lockdown, cushions are dog bed covers with memory foam cut to fit. pillows are recycled coffee sacks

photo_2020-06-03_11-16-41.jpg
 

LVRebel

GIF specialist
Founder
Member
Joined
Dec 9, 2020
Messages
2,969
Nice, if you don't mind how much was the supplies? We want to get a couple and have the spot picked out but wonder if it is a savings making one over buying one.
I think I was around $500-600 with all of the wood, concrete, gravel, hardware, etc. Not counting the soil. We got a truckload of good quality gardening soil, which I think was around $100.

For reference, my posts are 4x4, and all of the exterior pieces are 2x8
 

ArmchairTiger

Poster
Joined
Dec 9, 2020
Messages
38
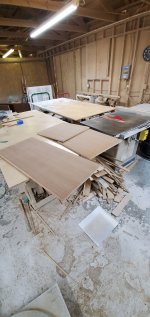
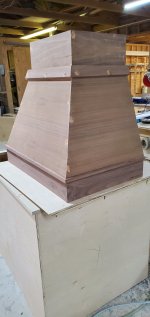
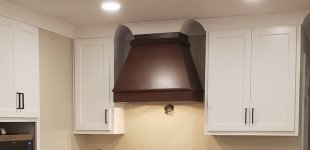
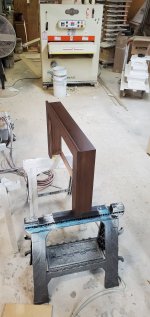
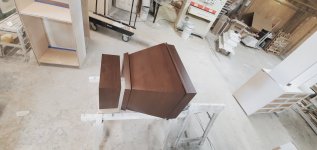
That looks great. What thickness of material did you use for that? Do you have a picture of the inside of it to show any additional supports? Or is it just a shell? How did you connect everything?
20201210_110538.jpg20201210_111154.jpg

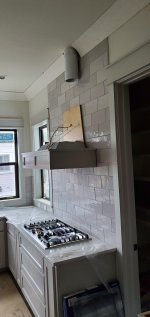
I don’t have a picture of the guts but the blower fastens to the box in the first pic. Then I add a vertical piece on the back that fastens to the wall that also connects to the front of the blower box. The middle section just slides into place so the components can always be accessible.
 

HnstTune

Elite
Founder
Joined
Jan 8, 2021
Messages
249
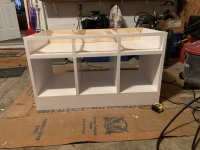
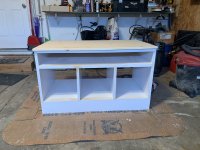
Been working on this cabinet and bench for my sister to put in a nook in her master bedroom.
 

Attachments

  • A33EF5C2-DE7A-4FED-AFA3-984F1568E499.jpeg
    A33EF5C2-DE7A-4FED-AFA3-984F1568E499.jpeg
    3.5 MB · Views: 9
  • 650B2646-3836-4690-B236-316D32612C33.jpeg
    650B2646-3836-4690-B236-316D32612C33.jpeg
    3.2 MB · Views: 8
  • B9F5A3D0-0ED2-4152-8655-DD9AD23A9AD4.jpeg
    B9F5A3D0-0ED2-4152-8655-DD9AD23A9AD4.jpeg
    2.3 MB · Views: 9

Sandford’s_Finest

Poster
Founder
Joined
Jan 11, 2021
Messages
210
View attachment 3299View attachment 3300

I don’t have a picture of the guts but the blower fastens to the box in the first pic. Then I add a vertical piece on the back that fastens to the wall that also connects to the front of the blower box. The middle section just slides into place so the components can always be accessible.
I have a ton of questions.
Where do you get your wood? Do you order it or do you have a local lumber place?
What type of wood do you prefer working with?
And what type of wood is easiest to stain?
Do you have to use a planer or jointer, or does the hardwood typically avoid the twisting and bowing like the softer woods tend to have?
 

ArmchairTiger

Poster
Joined
Dec 9, 2020
Messages
38
- My 2 main sources of lumber are Heritage Forest and Roy's Wood Products.

- Longleaf heart pine is my favorite

- Alder is a great wood to stain. Very uniform with very little splotching. It also clear finishes exactly like American cherry.

- When there is a big cup or twist in a board I'll try a few different things in dealing with it. Planer is good. Overhead sander is good. Heck sometimes a hand plane.
 
Last edited:

ArmchairTiger

Poster
Joined
Dec 9, 2020
Messages
38
I have a ton of questions.
Where do you get your wood? Do you order it or do you have a local lumber place?
What type of wood do you prefer working with?
And what type of wood is easiest to stain?
Do you have to use a planer or jointer, or does the hardwood typically avoid the twisting and bowing like the softer woods tend to have?
I meant to quote you above.
 

HnstTune

Elite
Founder
Joined
Jan 8, 2021
Messages
249
That looks good! Are you going to add cabinet doors on the bottom shelves or drawers on the top?
Leaving it all open. I think she has some baskets to put in the bottom 3 compartments and maybe some folded blankets to slide in the top shelf

- My 2 main sources of lumber are Heritage Forest and Roy's Wood Products.

- Longleaf heart pine is my favorite

- Alder is a great wood to stain. Very uniform with very little splotching. It also clear finishes exactly like American cherry.

- When there is a big cup or twist in a board I'll try a few different things in dealing with it. Planer is good. Overhead sander is good. Heck sometimes a hand plane.

My parents put knotty alder cabinets with clear finish on their kitchen last year and they look really nice. And I find using a hand plane to be pretty fun. Mostly my Stanley #5. And my kids love playing with the shavings.
 

Sandford’s_Finest

Poster
Founder
Joined
Jan 11, 2021
Messages
210
My dads got 2 or 3 walnut trunks that came down at his farm laid out drying that he said he’s going to build a dining room table out of if he can find someone to mill it. I’m hoping I can squeeze some out of him when he’s done.
I would love to have a 12-inch table jointer to do mill work, but I wouldn’t have room in my garage for it haha. For now the table saw and sander will have to do. I’ve used a planer but I think I would’ve had better success with a jointer and then finish with the planer on the other side of the board.
 
Top Bottom