1) Build it. The instructions in the box are good. If you have questions ask!
2) Download Cura <--- Click There
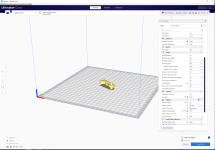
Cura is a "Slicer" software. It take your 3D model and it converts it into G-Code. G-Code is machine readable lines which tell the motors how to move....which motors to move, how fast, how much filament material to extrude, etc, etc... The slicer basically takes your model and calculates all possible combinations of moves to make and decides which moves are best. You save the file to an SD card (included in the box) and plug it into the Ender 6, and it will do the rest. Cura is largely regarded as the best slicer software. It is open source, so the community contributes to it....aka anyone can program the software, and if your modifications are good enough, the administrators of the software will include it into the next release of the software. This is great because that means Cura will get all of the best/latest and greatest features. For our purposes, this likely isnt going to be helpful because we will be using basic settings. The picture below is Cura with the Hammer file loaded up!

3) Buy filament. I HIGHLY recommend eSun/3D Fuel PLA+ (PLA Pro)
I will be providing tip and files for PLA+/Pro from these two brands. All PLA+/Pro will work similarly and the file wont need much tweaking, but other brands might need tweaking, and if you opt for standard PLA then it will need a little tweaking and I will not be able to help as much. If you opt for standard PLA you WILL NOT have a final product as reliable as if you use PLA+. Standard PLA is great for other products, so if you have it, don-t fret....but if you don-t plan to do anything else with the printer trying to sell or return it might be a good idea. Standard PLA should be good for non-structural parts like the stock, trigger, safety, etc....so if you want to use standard PLA for those pieces you can, but again, the files I supply will be for PLA+ for everything. My recommendation is buy black and another color you like, but if you want everything to be 1 color go for it. Ultimately you will need 2kg of filament. You can buy filament by 0.5kg rolls (4 rolls total) and you can buy it by the 1kg roll (2 rolls total). Im sure you can do the math...if you want 3 colors do 1kg, 0.5kg and 0.5kg. Anyway you get the idea. Ask questions if you have them.
4) Consider buying a digital caliper.
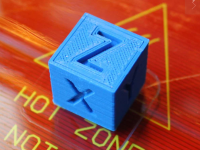
 A digital caliper is going to be good idea in order to determine how well your printer is calibrated from factory. If you choose to not do this step, then you will not know how well your FGC-9 will function (cycle, fitment, etc). Tolerances should be within 0.1mm, so we are going to test this by printing a "calibration cube" and performing measurements. The picture below is a calibration cube. You are very likely to have good enough calibration from factory. Pray that your factory cal is good enough, otherwise we have a whole new beast on our hands (which we will solve)

5) I'm going to spoon feed you as best I can, but you need to be a little self trained. I will provide some very good material to read and watch on YouTube, but do some of your own research on. A good first set of google searching is: "How do I print my first Benchy". Below you will find a good video on "Bed Leveling" but that's all I will leave you with right now. When I make the next post about actually DOING our first print, then I will provide a lot more material and I will possibly make some of my own videos (With an Ender 6 specifically). This bed leveling video will give you a general idea of how to manually level your printers bed with a piece of paper, but it is not an ender 6. On the ender 6, under the Settings menu, you will see "Leveling", "Refuel", "Move", etc... the "Leveling" menu is where you want to go. It has preprogrammed locations for your nozzle to travel to. The guy in the video has a custom program which always makes the nozzle move to a new spot. On the ender 6 you can just manually move the nozzle by navigating to the "Leveling" menu I mentioned above. But again, in the next post when I actually talk about starting a print, I will upload a custom video about bed leveling an Ender 6 manually.
-->> Click Here <<--
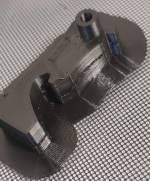
Here is a close up of the Hammer with supports still attached. I will explain supports later when it is necessary to explain them.

2) Download Cura <--- Click There
Cura is a "Slicer" software. It take your 3D model and it converts it into G-Code. G-Code is machine readable lines which tell the motors how to move....which motors to move, how fast, how much filament material to extrude, etc, etc... The slicer basically takes your model and calculates all possible combinations of moves to make and decides which moves are best. You save the file to an SD card (included in the box) and plug it into the Ender 6, and it will do the rest. Cura is largely regarded as the best slicer software. It is open source, so the community contributes to it....aka anyone can program the software, and if your modifications are good enough, the administrators of the software will include it into the next release of the software. This is great because that means Cura will get all of the best/latest and greatest features. For our purposes, this likely isnt going to be helpful because we will be using basic settings. The picture below is Cura with the Hammer file loaded up!

3) Buy filament. I HIGHLY recommend eSun/3D Fuel PLA+ (PLA Pro)
I will be providing tip and files for PLA+/Pro from these two brands. All PLA+/Pro will work similarly and the file wont need much tweaking, but other brands might need tweaking, and if you opt for standard PLA then it will need a little tweaking and I will not be able to help as much. If you opt for standard PLA you WILL NOT have a final product as reliable as if you use PLA+. Standard PLA is great for other products, so if you have it, don-t fret....but if you don-t plan to do anything else with the printer trying to sell or return it might be a good idea. Standard PLA should be good for non-structural parts like the stock, trigger, safety, etc....so if you want to use standard PLA for those pieces you can, but again, the files I supply will be for PLA+ for everything. My recommendation is buy black and another color you like, but if you want everything to be 1 color go for it. Ultimately you will need 2kg of filament. You can buy filament by 0.5kg rolls (4 rolls total) and you can buy it by the 1kg roll (2 rolls total). Im sure you can do the math...if you want 3 colors do 1kg, 0.5kg and 0.5kg. Anyway you get the idea. Ask questions if you have them.
4) Consider buying a digital caliper.
 A digital caliper is going to be good idea in order to determine how well your printer is calibrated from factory. If you choose to not do this step, then you will not know how well your FGC-9 will function (cycle, fitment, etc). Tolerances should be within 0.1mm, so we are going to test this by printing a "calibration cube" and performing measurements. The picture below is a calibration cube. You are very likely to have good enough calibration from factory. Pray that your factory cal is good enough, otherwise we have a whole new beast on our hands (which we will solve)
5) I'm going to spoon feed you as best I can, but you need to be a little self trained. I will provide some very good material to read and watch on YouTube, but do some of your own research on. A good first set of google searching is: "How do I print my first Benchy". Below you will find a good video on "Bed Leveling" but that's all I will leave you with right now. When I make the next post about actually DOING our first print, then I will provide a lot more material and I will possibly make some of my own videos (With an Ender 6 specifically). This bed leveling video will give you a general idea of how to manually level your printers bed with a piece of paper, but it is not an ender 6. On the ender 6, under the Settings menu, you will see "Leveling", "Refuel", "Move", etc... the "Leveling" menu is where you want to go. It has preprogrammed locations for your nozzle to travel to. The guy in the video has a custom program which always makes the nozzle move to a new spot. On the ender 6 you can just manually move the nozzle by navigating to the "Leveling" menu I mentioned above. But again, in the next post when I actually talk about starting a print, I will upload a custom video about bed leveling an Ender 6 manually.
-->> Click Here <<--
Here is a close up of the Hammer with supports still attached. I will explain supports later when it is necessary to explain them.

Last edited:
